Facebook button Flickr button Youtube button

Archive for the ‘Reviews’ Category

C3 stainless steel project

After getting back from Unicon 17, I realised that I have far more wheels than unicycle frames, and it was time to get a dedicated frame for my 700c standard racer. I had been using my 2008 Triton sponge frame, which is an amazing unicycle frame, but looks rather silly with a sleek racing wheel. It was designed for a 29’er mountainbike wheelset, and had enough clearance to drive a truck through. That notwithstanding, every time I wanted to go out for a ride, I’d be swapping wheels in the frame.

I was originally planning a titanium road frame, but with Dmitry at Triton busy with bicycles over the 3yrs I had been pestering him, I had to find a local alternative. With three titanium unicycles and a Litespeed titanium road bike, you can probably guess I am a big fan of the grey metal. The great thing about titanium is that it is strong, corrosion resistant, doesn’t need painting, and still looks great many years later. It is also hard to work with, which is why there are few ti builders around.

So with a bit of research I came across the new stainless steel tube sets being used on bicycles. Most of the bicycle tube manufacturers are making them, and they are perfect for custom bike frames. As yet, though, I am not aware of any stainless steel unicycles. Stainless steel doesn’t need painting, is light, strong, and, in my opinion, looks even better than titanium….I would be swapping grey metal for the shiny one.

I looked up several frame builders in New Zealand, but settled on Anders Waiker at C3 (crucial custom cycles) in Petone, not far from where I live. It meant I could pop by during the week to sort out any design issues. He makes some beautiful mountainbike frames, so I was keen to work with him.

We decided to use the KVA MS3 tubeset, which has a built in curve for a bicycle chainstay. We thought the s-bend would look pretty cool on a unicycle. It took a few weeks for the tubes to arrive from the US, but here they are:

KVA MS3 Stainless Steel Tubeset, ready for welding

Now you’d think a unicycle frame is a fairly straight forward thing to build, but once you add in curves it becomes a bit more complicated. Luckily, I could bring in my 700c wheel to slot into the frame to help with measurements, because my framebuilder is local.

We had less clearance than expected, which meant that Anders had to crimp the legs slightly. On the other hand, the s-bend gives heaps of foot clearance, which is vital to anyone who races standard class.  You want your feet as close to the frame as possible to maintain a high cadence, but you don’t want your feet hitting the frame either. An added bonus of bicycle tubing is you get the special things they do to bicycle tubes, such as double butting. These tubes are superlight!

Anders fillet brazed the frame, giving it a smooth seamless appearance. Check out the seat-tube and fork leg interface:

Sexy curves

The fork was completed with a mirror finish (it took Anders 3 days to polish it!), and sent off for painting. Unfortunately the painter had undergone hand surgery, so it took a couple of months to get it back.  Anders topped the frame off with a very nice Thompson seat clamp.  

The complete specs are:
Nimbus Eclipse hub
Wheelsmith SS spokes
Mavic Open Pro rim
Schwalbe Kojak 700x35c folding tyre
Nimbus Venture 89mm cranks
Welgo M111 pedals
Kris Holm seat post
NNC Flatfish saddle

Total weight is 3.410kg with the above specs. I did some swapping of components (75mm nimbus cranks and 700x23c Rubino Pros), and swapping seats (my other Flatfish saddle uses lighter foam), which brought it down to 3.133kg. Not far off a sub-3kg unicycle, which should be achievable with a few component tweaks. 

So how does it ride? Unlike a bike, the frame has less influence of the ride than the wheel itself. The main requirements are stiffness, particularly on climbing and cornering, adequate clearance, and lightweight.

I’m pleased to report the C3 stainless racer performs well on all three counts. I jammed it up the steepest hill I could find, which would normally flex any unicycle frame. Despite trying my hardest, there was no rub at all, even with the small clearance between the spokes and the frame.  It corners like a dream, tracking exactly where I point it, even when driving hard into a turn.

The s-bend stiffens the frame and gives oodles of room to get my feet close to the midline without rub. Not a big deal for most riders, but for anyone spinning over 160rpm, the last thing you want is to hit the frame with your foot. Weight-wise, the frame is comparable to the Tritons at a shade over 600g. Although the butted stainless steel tubes are lighter than titanium, the bearing holders on the Tritons are quite unique. As a result, the C3 frame is weighted toward the bearing holders, which gives it a lower centre of gravity- not a bad thing.

Although I built the unicycle as a racing uni, most of the time…it won’t be. That means no excuse for wearing lycra either!  Baggy shorts are not a good combination with unicycle frames, they tend to snag on the fork crown.  With the s-bend C-3 racer, I can ride my unicycle any time, anywhere, and not worry about ripping my shorts to bits.

Oh yeah, did I mention it looks cool?

P1080692 P1080572 P1080590 P1080675

The makings of a Schlumph Hub

Here is a video showing the makings and workings of a Sclumpf hub.

Unicycling Injuries: how to drain a subungual haematoma

I’m going to do a few articles on unicycling injuries, but I thought I would I would start with a subungual haematoma, after sustaining one at yesterdays Karapoti Classic mountainbike race.

A subungual haematoma is basically a collection of blood underneath a toenail or fingernail. They are sustained from trauma to the nail- usually stubbing the toe or dropping something on it.  They are painful because of the pressure exerted by the haematoma.

A subungual haematoma should be drained to:

-alleviate pain

-prevent the nail from coming off (due to pressure)

-help the nail grow smoothly.  If left undrained, the nail often grows over it in a ridge pattern, because of the irregular nail bed

Here is a little instructional video I made on draining a subungual haematoma with the paperclip method.  It’s a useful bit of first aid which will save you  a trip to the emergency dept.

NNC Flatfish: The worlds best unicycle seat!

Those of you who follow my rantings on the unicycle forums know I’ve had issues with unicycle seats for as long as I have been a unicycling. I’m not the only one, because saddle comfort seems to be the biggest thorn in crotch of long distance unicyclists.

This medieval torture device comes in more or less one shape, because most modern unicycle seats use the same plastic KH/Velo bases. It takes years to recoup the cost of designing and producing a plastic base, hence there are few choices available. The differences between the various models relate to how much foam is used to pad it out with. They universally curve upwards to wedge against your crotch, and are fatter, heavier and wider than necessary.

A unicycle saddle looks and rides like a horse saddle, despite the motion of our legs and posture being closer to that of a bicyclist. My theory is that prior to the recent popularity of long distance unicycling, most unicyclists rode freestyle, or took part in short distance races. It was necessary to have an upwards wedge to keep you on the saddle during hands free maneuvers.  That is not the case with road unicycling- we always have our hands on the handle.  It would be akin to having an upward curvature on a bicycle saddle to stop you falling off the front.

Enter Peter Barrell, a unicyclist from Waikanae, a small coastal settlement an hour north of Welllington.  On my recent visit to NZ, I mentioned the problem of curved seats, and it so happened that Peter is a whizz at making carbon fibre parts. With little encouragement required, Pete designed a mold for a flat, carbon fibre unicycle saddle.

  ..

The result is the flattest, thinnest and also one of the lightest, unicycle saddles I’ve used. We call it the NNC Flatfish. NNC stands for ‘No Nut Crush’.

I cannibalised a few parts from an old KH seat, which fitted nicely on the new base. Although the base itself is flat, my seat had a very mild curve because of the mounting hardware at the front. It would be easy to trim this down if necessary.
A little bit of anatomy- the two bony bits of your pelvis which you sit on are the ischial tuberosities (the ‘sit bones’). That is what should be in contact with the widest part of the saddle, and is what a saddle should support. There is no need for the saddle to squish the squishy parts of your anatomy, which is the rest of the perineum. In a male, the squishy parts of your anatomy corresponds to where the KH seatbases does a 45 degree upwards turn.


Every male unicyclist should do this….take off your clothes. Now sit on a KH saddle. Notice how your scrotum bulges upwards in a most unsatisfactory way. This is not natural. It is not good for you, and it is not good for future generations.  Not so with the NNC Flatfish. I did the same experiment, and suffice to say, things had room to hang. I have left the male anatomy out of this diagram, but it sits just under the symphysis pubis.
So how does it ride?
I thought I would try the most crotch numbing ride imaginable- long distance on a standard racing unicycle (125mm/24”/100PSI), which amounts to low resistance, ultra-high cadence riding. Not only that, I would use regular shorts, rather than bike shorts. On a regular saddle, you’d be crying on the side of the road after 10km.
I’m happy to report that I’ve ridden over 50km at an average speed of 18km/hr with no dismounts. The only thing which hurt was my back, and my legs, but not my crotch. Since then I’ve put in several hundred kms on the NNC saddle, and it is the best unicycle saddle I’ve ever used. In terms of stiffness, the Carbon Fibre base doesn’t flex at all, which is good  when you’re pulling hard on the seat.  Although I’ve yet to test it off-road, the lower handle position seems to allow more leverage (your biceps brachii generate the most power when it is close to it’s full length), so I think it will be great for MUni.

I will be mounting a KH t-bar to it to tackle this year’s 160km Lake Taupo Cycle Challenge. Looking forward to it!

See this thread for our discussion on the NNC Saddle: http://tinyurl.com/9glullf

More photos on our Facebook Page: http://tinyurl.com/9tjz43j

Triton Disc, Spirit Cranks and Nimbus Flat Review

I have wanted to write product reviews for Adventure Unicyclist for some time, after modifying, breaking, and throwing many parts away in frustration. I hope you find my views as a road unicyclist useful. While I try to be impartial…much of unicycling comes to personal preference.

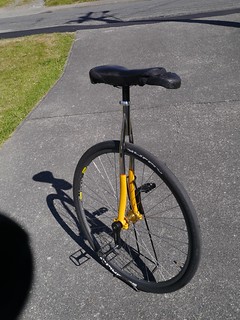
With my latest 36” Triton build, I thought this would be a good chance to look at some recent unicycle parts. I raced this rig at UNICON 16 in the Marathon, 100k, and 10km events, so the equipment was pushed pretty hard.

The 36” Triton Frame

I had ridden a standard KH 36” for about 4yrs. While it’s not a bad frame, there are several shortcomings, specific to aluminium rather than the KH. Namely, the frame looks fine for a few rides, but after numerous dings, crashes and corrosion, it looks terrible. Aluminium is comparably soft- I’ve stripped the thread on an old KH frame and several (non-KH) aluminium cranks.

Not so with the titanium. It costs more, but what you get is virtually bombproof and will look like it came out of the factory many years later. Recently, my 2008 Triton 29” was scratched to bits against spikey pedals. With steel wool, it polished up nicely and you can’t tell it apart from a new one.   If you want something cheap, light and stiff, and blue is your favourite colour, you can’t go past the KH frames. They work for most people, and they are constantly being updated. In terms of value for money- that is a difficult proposition…although the Triton costs more than twice the KH, it will last much longer.

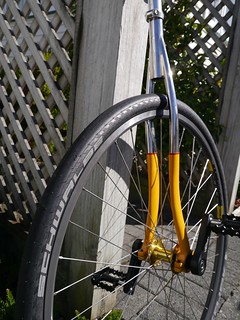
The 36” Triton disc is similar to the previous Tritons, but comes complete with disc tabs for a 180mm rotor. This was built to take the original SINZ Mt Uni Disc Brake cranks, but it is also compatible with the KH Spirit Disc brake.  Magura brake bosses are included if you wish to run rim brakes. An added bonus of having disc tabs is that you can use different wheelsets on the same 36” frame.

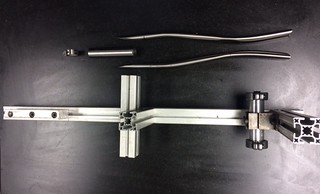
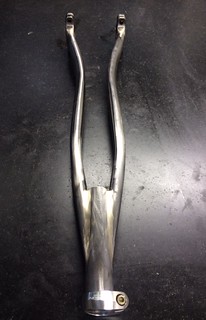
For someone short like me, it helps that the seatpost has been cut low.   The frame is available in brushed bare metal titanium with big industrial ‘TRITON’ stickers down each fork leg. You’re given a spare set of stickers, but they do come off after hard use, so I leave them off after. The welds are clean and functional, almost on par with my $8000 Litespeed Archon road bike. The fork legs are low in profile to avoid rubbing your heel, but if you have fat thighs like me, you may still squish them against the fork crown, even though it has been cut off at an angle to minimise this.

The wheelset

The original wheel consisted of a 2008 KH/Schlumpf hub built on a Nimbus Stealth Rim. Unfortunately the spokes were laced in a 4 cross pattern instead of 3 cross (*because there were no spokes of suitable length in NZ the time). As a result, the wheel was as flexible as a noodle, and resulted in significant brake rub. Despite truing and re-tensioning, I had to release the brake completely when doing the Lake Taupo Cycle Challenge last year. Added to my misery was the gorilla like strength required to pry a Nimbus Nightrider tyre off the rim.  I’d had enough and decided to rebuild the wheel.

The new wheelset was built with the Nimbus II rim, using the same shaved Nightrider tyre I had previously. I replaced the heavy 36” inner tube with a clear 36” Foss Tube for a weight saving of another few hundred grams. This made for a stiffer, lighter, livelier wheel, but best of all, I no longer dreaded changing my tyre! The bead rolled off the rim easily, only needing gentle coaxing with a tyre lever; rather than the lubricated, grimacing, yelling, hernia popping experience I was used to.

The Disc Brake and Spirit cranks

The disc was a mid-range set of Shimano Deore caliper paired to a Shimano XT 180mm rotor. It was cheap and functional, and the mechanics at my local bike shop are big fans due to their ease of servicing. They had more than adequate stopping power and modulation.

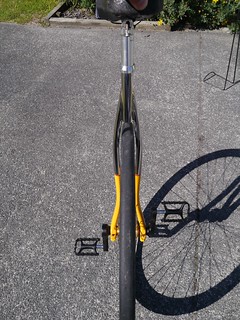
I used a KH Starfighter extension on the brake lever. At NZ$40, it is a pretty expensive lump of not much aluminium, but looks cool and works well. Compared to the earlier KH plastic spooner, it should last longer and is more adjustable (and hence fit more styles of lever). I only wish it looked like the Millennium falcon rather than a wimpy Starfighter….I have to turn the brake towards my lever hand to reach it adequately.

The disc rotor was bolted onto the new KH Spirit dual-hole cranks, in 125/150mm size. I was never a fan of dual-hole cranks- they look crude and inelegant. How wrong was I!   The extra fiddlyness of setting up a disc brake, putting on a Schlumpf crank, and getting a torque lever in narrow places; was enough to convert me. I found the 125mm cranks much smoother, but moved back to 150mm for added power.  All done with little more than an allen key.

The main concern with disc brakes and Schlumpf hubs are frame clearance issues. On older model KH Aluminium frames, some filing/shaving is required in order to get adequate clearance between the hub and the frame, and between the frame and the rotor bolts. The titanium frame is less chunky than the aluminium KH, but I was still concerned about the amount of clearance I’d have with my rotor bolts. When the disc finally arrived, I was relieved to find about 1- 1.5mm gap between the rotor bolts and the outside of the bearing caps

And then the unexpected happened- or perhaps the expected unexpected. After a few rides with my new setup, the Schlumpf hub broke! A spoke had ripped out of the flange on the hub. I found out later that the older KH/Schlumpf hubs require directional spoke lacing (the spoke holes are not symmetrical) – something my bike shop wasn’t aware of nor was it specified when I bought the original wheel four years ago. My wheel builder had laced the wheel the wrong way, which put too much tension on the flange and ripped a spoke through it.

The 2012 KH Schlumpf hub

Luckily for me, Florian Schlumpf happened to be at UNICON, and I purchased a new hub to install in my unicycle, and Marco Vitale kindly rebuilt the wheel for me. Now, I have a new hub to review as well, which in theory, should work better as it has a longer axle and hence should have greater disc brake clearance.

If only life were so simple. The new hub axle is 4mm longer than the old (152mm vs 148mm), but when I installed the cranks onto the hub, they sat further in on the ISIS splines. Now, instead of 1- 1.5mm clearance, I had zero clearance between the rotor bolts and the bearing caps of the Triton frame!  I temporarily solved this issue by putting PVC tape on the spline- which pushed the crank out just enough that I have  a few microns separating the rotor bolts (and myself) from oblivion should they ever come loose .  I have since shaved the Triton bearing caps with an angle grinder, and I now have about 1mm clearance.

The other clearance issue facing many disc users the gap between the inner fork leg and the Schlumpf dust cap. I believe this is a problem for the newer hubs because of some extra (bulkier) seals. However, it is not a problem on the Triton, which has oodles of inner clearance due to the thin tubing.

The Nimbus Flat seat and handlebars

I have used most editions of the KH Seat since they first came out. Coming from a bicycling background, I cannot see why unicycle seats are shaped like horse saddles.  A seat should support your ischial tuberosities (the bony protuberances of your pelvis), and then not wedge against your crotch.

I thought I’d try the Nimbus Flat, which is one of the newer, thinner seats available. When it arrived, I was disappointed at how fat it looked…it was as thick as my regular (shaved down) seats. It was thicker and wider up front than the Impact Naomi- my favourite seat (and the only one where I have not cut down the foam).

The cover is stapled on, rather than relying on shoelaces to hold it together, which makes it difficult, if not unfeasible, to modify.  For the aesthetically challenged, the seat cover looks like a pigeon shat on it. The only redeeming factor is that the grey colour matches Titanium.

Comfort wise, it is passable, and definitely better than overstuffed horse saddles like the KH Freeride (although you can easily trim the foam).  The wide front and upwards bend does get in the way, but until we get a flat, narrow, thin, seat, this is all you can expect.

At 750g, the weight is comparable to the Impact Naomi and KH Slim saddles, but still three times heavier than an equivalent bicycle saddle. I used a KH T-Bar, which bolts onto the Nimbus saddle nicely. If you run this handlebar setup, get the Nimbus Flat (or other KH style seat). If you don’t use a KH T-Bar, get the Impact Naomi.

How does the whole thing ride?

My 36″ Triton Schlumpf rides pretty well for a geared unicycle. The wheel is stiff and it tracks well.  This is partly due to the new wheel build, and partly due to the very rigid Titanium fork legs.  I had a few crashes, but the frame handled it all and I haven’t noticed a single scratch or dent.

My favourite thing (despite the complexity) is the disc brake. It is so buttery smooth I found myself using it more than I am accustomed to. No sudden grabs, no disc rub, and strong enough to give me confidence to descend technical downhills in high gear. I think a disc brake is necessary if you are riding a Guni, simply because of the extra speed you have to keep in check.

Shifting was good with the KH Spirit cranks- they flare out but I didn’t notice the extra Q-factor (probably because of the higher gear and lower cadences). They are about 150-200g lighter than the older KH Moment cranks, which I refuse to put on any unicycle because of the weight.

The seat got in the way a little because of the bulk (compared to my cut down seats), but I completed the 100km Unicon race without too much discomfort. .

The newer KH/Schlumpf hub is reinforced at the flange to prevent further breakages, and can now be laced in both directions, so that is a big plus. Aside from the rotor bolt clearance issue (really, the axle needs to be longer), it worked as well as the old hub. I didn’t notice any difference in shifting performance over the 2008 KH/Schlumpf hub.  As with all Schlumpf hubs, it’s bloody heavy, and it makes the unicycle feel like a tank, but it’s the sacrifice we have to make for racing.

So in summary- I love the frame, I like the disc, I can put up with the saddle, and the geared hub works as well as you can expect at this stage of development.

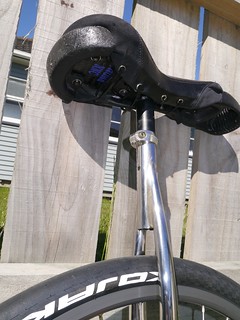
(*note that pictures below show a cut down KH Freeride seat, not the Nimbus Flat)